要求:
- 使用 Let’s Encrypt 免费证书
- 不改动 Apache 配置,Apache 已在运行(不用停止)
- 自动续期
- 支持 CentOS/TencentOS 8 系(即 platform:el8)
准备
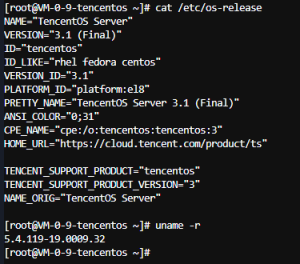
1、查看系统发行版信息(CentOS、Rocky、Ubuntu 等):
$ cat /etc/os-release
2、查看内核版本:
$ uname -r
通配符证书(*.example.com)
通配符证书可以让你一次性覆盖所有子域(如 www.example.com、api.example.com、img.example.com 等),非常实用。
不过要注意:
- Let’s Encrypt 的通配符证书必须使用 DNS-01 验证方式。
- 也就是说,你需要在域名 DNS 里添加一个 TXT 记录来验证你确实拥有该域名。
- 不能用 HTTP 验证(–webroot、–standalone 都不行)。
使用 acme.sh + DNS API(自动化、轻量、不停服务)
acme.sh 是一个非常成熟的轻量级 ACME 客户端,完全兼容 Let’s Encrypt。
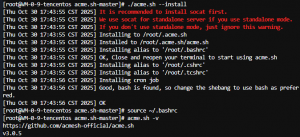
1、安装 acme.sh
国内建议使用压缩包(镜像不稳定):
wget https://gitee.com/neilpang/acme.sh/repository/archive/master.zip -O acme.sh.zip
unzip acme.sh.zip
cd acme.sh-master
./acme.sh –install
#激活环境变量
$ source ~/.bashrc
验证安装:
$ acme.sh -v
//https://github.com/acmesh-official/acme.sh
//v3.0.5
2、根据 DNS 提供商,获取 API 秘钥
1.查看域名的 DNS 服务商:
$ nslookup -type=ns example.com
服务器: UnKnown
Address: xxxx::xxxx:888:xxxx:xxxx
非权威应答:
example.com nameserver = dns9.hichina.com
example.com nameserver = dns10.hichina.com
$ dig ns example.com
acme.sh 支持大量 DNS 平台的 API,比如:
| DNS 平台 | 参数名 | 官方文档 |
|---|---|---|
| Cloudflare | dns_cf |
https://github.com/acmesh-official/acme.sh/wiki/dnsapi#dns_cf |
| 阿里云 | dns_ali |
https://github.com/acmesh-official/acme.sh/wiki/dnsapi#dns_ali |
| 腾讯云 DNSPod | dns_dp |
https://github.com/acmesh-official/acme.sh/wiki/dnsapi#dns_dp |
2.配置阿里云 API 秘钥
- 获取阿里云 API Key
- 左侧点击「访问控制 RAM → 用户管理 → 新建用户」
- 给用户授予「AliyunDNSFullAccess」权限
- 在「访问密钥管理」中创建一对 AccessKey ID 和 AccessKey Secret
3、设置环境变量
1.设置临时变量
export Ali_Key=”LTAIxxxxxxxxxxxxxxxx”
export Ali_Secret=”xxxxxxxxxxxxxxxxxxxxxxxx”
注意:
- 命令区分大小写。
- 临时变量,每次重启服务器后要重新执行,除非写进 /etc/profile 或 ~/.bashrc。
2.写入 acme.sh 配置文件
vim ~/.acme.sh/account.conf
Ali_Key=”LTAIxxxxxxxxxxxxxx”
Ali_Secret=”xxxxxxxxxxxxxxxx”
保存后,acme.sh 在续期证书时会自动使用这些 Key 进行 DNS 验证。
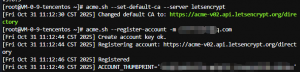
4、申请通配符证书(自动 DNS 验证)
# 设置 默认的 CA(证书颁发机构) 为 Let’s Encrypt
$ acme.sh –set-default-ca –server letsencrypt
#向 Let’s Encrypt 注册一个账号
$ acme.sh –register-account -m demo@qq.com
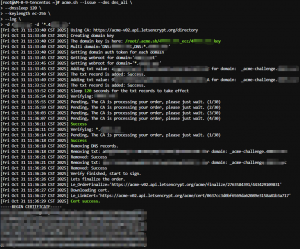
$ acme.sh –issue –dns dns_ali \
–dnssleep 120 \
–keylength ec-256 \
–log \
-d example.com -d ‘*.example.com’
[Fri Oct 31 11:36:29 CST 2025] Cert success.
—–BEGIN CERTIFICATE—–
xxx
—–END CERTIFICATE—–
[Fri Oct 31 11:36:29 CST 2025] Your cert is in: /root/.acme.sh/example.com_ecc/example.com.cer
[Fri Oct 31 11:36:29 CST 2025] Your cert key is in: /root/.acme.sh/example.com_ecc/example.com.key
[Fri Oct 31 11:36:29 CST 2025] The intermediate CA cert is in: /root/.acme.sh/example.com_ecc/ca.cer
[Fri Oct 31 11:36:29 CST 2025] And the full chain certs is there: /root/.acme.sh/example.com_ecc/fullchain.cer
![]()
注:acme.sh 会等待 120 秒(这里需要耐心等待,并不是卡住了),让 DNS 生效(让 Let’s Encrypt 能查到刚刚添加的 TXT 记录)。
解释:
- –dns dns_ali: 使用阿里云 DNS 验证
- –dnssleep 120: 等待 DNS 生效时间(两者都建议保留)
- –keylength ec-256: 生成 ECDSA 证书(更轻更快),不加默认 RSA 2048,也完全没问题
- –log: 生成详细日志文件(调试用,平时不需要)
5、安装证书(放到 Apache 读取的位置)
1.注意事项
1)确保目标目录存在并有写权限
mkdir -p /etc/ssl/private /etc/ssl/certs
chmod 700 /etc/ssl/private
确保目标目录存在并有写权限
2)检查Apache 是否支持 reload
$ systemctl show httpd.service –property=ExecReload
如果输出类似:
ExecReload=/usr/sbin/httpd $OPTIONS -k graceful
说明支持 reload 或 graceful 重载。
如果没有输出,说明不支持,可以使用其他命令重启apache
注:
- 某些精简版或自编译版 Apache(例如腾讯云、宝塔面板等环境)中一般都没有
- 宝塔使用:/etc/init.d/httpd restart
- 支持reload:systemctl restart httpd
- 不支持:systemctl restart httpd
3)上边获取的是ecc证书,这里安装时也要加上-ecc
2.安装证书
acme.sh –install-cert -d example.com -ecc \
–key-file /etc/ssl/private/example.com.key \
–fullchain-file /etc/ssl/certs/example.com.cer \
–reloadcmd “/etc/init.d/httpd restart”
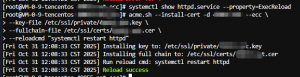
这个命令的作用:
1)把 acme.sh 管理的证书复制/安装到你指定的路径:
- 私钥 → /etc/ssl/private/example.com.key
- 证书链 → /etc/ssl/certs/example.com.cer
2)设置续期后的执行内容:
- acme.sh 会自动续期证书,但安装路径指定的证书文件会被更新
- -reloadcmd 会在续期后自动执行,保证 Apache 使用最新证书
错误:宝塔面板执行“systemctl restart httpd ”,展示成功,apache却没有开启
–reloadcmd “systemctl restart httpd”
注:宝塔可能根本没有创建 httpd.service,所以 systemctl restart httpd 实际上是 重启了一个不存在的服务。
acme.sh 看到命令返回成功,就误以为重载成功。
6、Apache 配置
1.保存以下配置文件:
<VirtualHost *:443>
ServerName example.com
DocumentRoot /var/www/html
SSLEngine on
# 证书路径(acme.sh 安装)
SSLCertificateFile /etc/ssl/private/example.com.cer
SSLCertificateKeyFile /etc/ssl/certs/example.com.key
# 日志(可自定义)
ErrorLog /var/log/httpd/example.com-ssl-error.log
CustomLog /var/log/httpd/example.com-ssl-access.log combined
# 推荐的 SSL 协议和加密套件
SSLProtocol all -SSLv2 -SSLv3
SSLCipherSuite HIGH:!aNULL:!MD5:!RC4
SSLHonorCipherOrder on
SSLCompression off
# HSTS 安全策略
Header always set Strict-Transport-Security “max-age=31536000; includeSubDomains; preload”
</VirtualHost>
# ===========================
# HTTP 虚拟主机 – 自动重定向到 HTTPS
# ===========================
<VirtualHost *:80>
ServerName example.com
ServerAlias *.example.com
DocumentRoot /var/www/html
# 启用 URL 重写
RewriteEngine On
RewriteCond %{HTTPS} !=on
RewriteRule ^/(.*)$ https://%{SERVER_NAME}/$1 [R=301,L]
# 可选日志
ErrorLog /var/log/httpd/example.com-http-error.log
CustomLog /var/log/httpd/example.com-http-access.log combined
</VirtualHost>
2.测试 Apache 配置:
$ apachectl configtest
//Syntax OK
3.重载 Apache
4.验证证书:
1)测试 HTTPS/SSL 连接和证书信息
# 用命令行模拟浏览器或客户端访问 HTTPS,查看 SSL/TLS 连接是否正常,并输出证书信息、验证结果、支持的协议等,是 SSL 调试和验证的标准命令
$ openssl s_client -connect example.com:443 -servername example.com
参数说明:
- openssl OpenSSL 工具,用于各种加密和证书操作
- s_client OpenSSL 的“客户端”模式,用来模拟 SSL/TLS 客户端连接
- -connect example.com:443 连接到指定域名和端口(443 是 HTTPS 默认端口)
- -servername example.com SNI(Server Name Indication)
应显示:
subject: CN=example.com
DNS:example.com, DNS:*.example.com
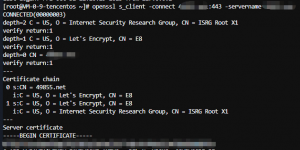
截图说明:
$ openssl s_client -connect example.com:443 -servername example.com
CONNECTED(00000003)
depth=2 C = US, O = Internet Security Research Group, CN = ISRG Root X1
verify return:1
depth=1 C = US, O = Let’s Encrypt, CN = E8
verify return:1
depth=0 CN = example.com
verify return:1
—
Certificate chain
0 s:CN = example.com
i:C = US, O = Let’s Encrypt, CN = E8
1 s:C = US, O = Let’s Encrypt, CN = E8
i:C = US, O = Internet Security Research Group, CN = ISRG Root X1
CONNECTED(00000003):
说明已成功建立到服务器 443 端口的 TCP 连接
之后是证书链验证:
- depth=2 → 根证书:ISRG Root X1
- depth=1 → 中间证书:Let’s Encrypt E8
- depth=0 → 你的域名证书:example.com
verify return:1 表示 验证成功,没有报错
Certificate chain:
s: → Subject(证书所属)
i: → Issuer(签发机构)
说明证书链完整,从你的域名证书 → 中间证书 → 根证书
2)测试子域名(需要确保子域名有dns解析)
openssl s_client -connect test.example.com:443 -servername test.example.com
输出内容与上边一致
3)查看 SAN
实际子域验证看 SAN(Subject Alternative Name) 字段,通配符证书会在 SAN 中包含 *.example.com
$ openssl x509 -in /etc/ssl/certs/example.com.cer -noout -text | grep -A1 “Subject Alternative Name”
输出应包含:
DNS:example.com, DNS:*.example.com
![]()
7、自动续期(无需手动操作)
acme.sh 会自动在系统 crontab 中添加任务,每天检测是否需要续期。
crontab -l
0 0 * * * “~/.acme.sh”/acme.sh –cron –home “~/.acme.sh” > /dev/null
- acme.sh 会自动读取 account.conf 的 API Key/Secret
- 无需 export 环境变量
- 证书到期前会自动续期,并执行 –reloadcmd 重载 Apache